Automated user migration and management of AWS Identity and Access Management (IAM) resources using AWS IAM, AWS CloudShell, and Shell Script.
Overview of the Project:

Project Description:
I took on the role of a Cloud Specialist in this project, which was based on a real-world scenario. My tasks included managing AWS (Identity and Access Management) IAM resources and automating the migration of 100 users.
As a security best practice, 100 users required to have their accounts transferred and have multi-factor authentication (MFA) setup.
I had to consider automating the operations in order to avoid doing tedious manual tasks in the AWS dashboard.
Methodology of Solutions:

My Personal Experience:
Below are the specifics of how I resolved this situation using AWS IAM, AWS CloudShell, and Shell Script.
Part 1 of 2: User Creation
To create groups, attach rules to groups, create users, and add users to groups, use AWS IAM, AWS CloudShell, and shell script.
We received a spreadsheet from the client with 100 users. One of five roles — CloudAdmin, DBA, LinuxAdmin, NetworkAdmin, or Trainees — will be occupied by the users.
Alright, who wants to hand-jam 100 users? Yes, I didn’t think that.
Fortunately, if we have a.csv file with the following format: user, group, and password, our shell script can create users automatically.
Thankfully, we can utilize the customer-provided spreadsheet to create usernames (email address prefixes) and groups (Teams). We can simply set the password to our choice and require people to change it when they log in for the first time.

We will convert the spreadsheet into a.csv file with columns for users, groups, and passwords before we actually get started. This is just a straightforward find/replace operation, and the output.csv file looks like this:

Notice: This example only includes six (6) users in order to save time. This is just an example; you could easily handle larger numbers of people because it’s totally automated.
Now, let’s create the groups. We could do it the boring way through the graphical user interface (GUI) via AWS IAM, or we can do it the thrilling, exciting way, via the AWS CloudShell, and flex some command-line interface (CLI) skills:
After creating the groups, we can get a list of groups, and make sure what we wanted is now present.


We can check on AWS IAM, just to cross-check what we did in AWS CloudShell.

Of course, different kinds of permissions will be granted to different groups. Another option is to use AWS CloudShell for this:

In the below screenshot, you can see that the permissions are attached to the CloudAdmin group we created earlier.

Likewise with the Trainees group.

We are now prepared to add the users to the groups, so we will immediately submit our CSV. File. Actions > Upload File.

Our upload was successful!

We glance over the CSV’s contents rapidly.

You may encounter a problem where line feeds don’t completely transfer across operating systems if you’ve ever had to deal with editing files that were moved between Windows and ‘Nix. Luckily for us, dos2unix was developed to address this problem. We’ll quickly install this because our script uses it. If you are interested in the command syntax, enlarge the screenshot.

We quickly glance at the script file. What’s most interesting in this script is the reading of the csv file, ignoring the row with “user” in it, as that is the header row. Then, the user, group, password are set as variable to create the users leveraging “aws iam create-user, aws iam create-login-profile and aws iam add-user-to-group.
Also, notice that this script uses the dos2unix to fix the line endings of input (the .csv file) so it can be read properly in Linux.
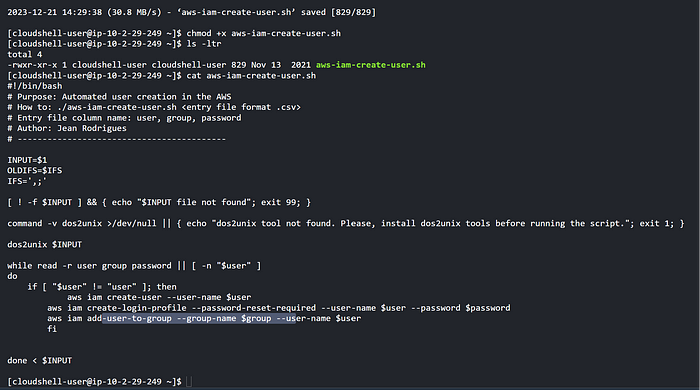
The script should be executable, so let’s fix that.

Now, let’s run the script, referencing the CSV file. Notice how the users are being created.

Including a list of users to ensure their existence.

Examining the graphical user interface. [As previously mentioned, just brought six (6) users to show off the automation.]

Something is missing from our list! Let’s take immediate action to address our oversight of ensuring end users have authorization to modify their passwords.

I quickly glanced over to make sure the change password policy was caught up by the NetworkAdmin group.

From the IAM Dashboard, we can obtain the sign-in URL for the MFA users.

We will log in as jane.doe, one of the users from the CSV. It is recommended to do this testing in a browser set to Incognito/Private mode, to prevent any bleed-over from your other sessions.

We are now logged in as jane.doe

As a database administrator (DBA), jane.doe is unable to access IAM and encounters authorization issues when attempting to use the IAM Dashboard.

Part 2 of 2: Best practices : MFA and Password Policy — Use AWS IAM and AWS CloudShell to enable MFA for root user, create MFA policy, attach MFA policy to groups and adjust Password Policy.

Put the name of the MFA device here (for TheCloudBootcampMFA, my example is tcbMFA).
Pick the authenticator application.
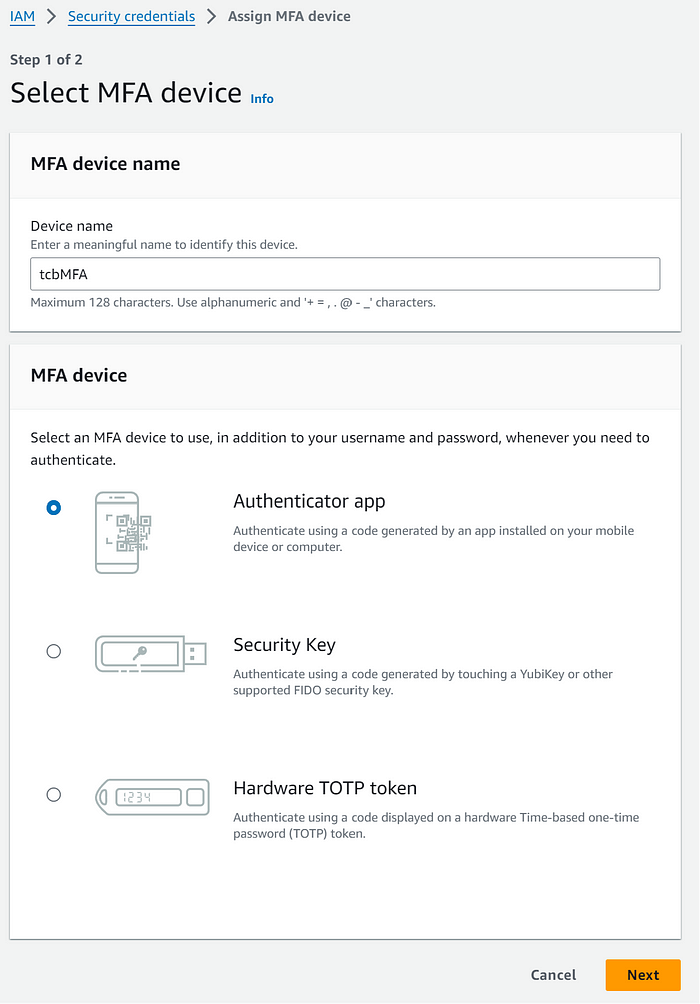
After swiping down, select Next.
After selecting Add MFA, enter two codes from your MFA device.

Now, the root user should have the Virtual MFA device.

Next, we need to setup all the other users for MFA. We can assign a policy, such that everyone has to use MFA. You want to copy the JSON on this page: https://docs.aws.amazon.com/IAM/latest/UserGuide/reference_policies_examples_iam_mfa-selfmanage.html
Then, go to IAM > Policies > Create Policy. Choose JSON, and paste that JSON you copied earlier into the policy editor,


Scroll to the bottom and Click Next.

Add a policy name and a description.

Scroll to the bottom, and choose Create policy.

You will receive confirmation that the policy was created.

If you filter the policies list, you should see the EnforceMFApolicy

You now need to get the Amazon Resource Name (ARN) for your customer-managed policy. An ARN is a globaly unique name to refer to a resource in AWS. In this case, we need the ARN for our EnforceMFAPolicy, so that we can refer to it in CloudShell. You can find it by filtering for the policy, and clicking on its name. Look for the ARN field.

Now, back to the CloudShell, where we will attach this policy to our groups.


Note: Philip Jack did not log out since the change, and he now gets an error when attempting to go to Amazon RDS > Databases, even though he’s in the DBA group.

Please note that the entire point of this exercise was to enforce MFA, and it appears to be preventing Philip Jack from working. The solution is simple: enable MFA on Philip Jack’s account, the same as we did for the root account.

So, we’ll have Philip go to Security Credentials, and setup an MFA device for his IAM user account. [The steps are exactly the same as they were for the root user, so there will not be screenshots.]

We then make sure that Philip Jack signs out, then signs back in. Now, he is prompted to use MFA to complete his login.

After signing in successfully, Philip can now use Amazon RDS > Databases.

The password policies are the last item we want to change. We think the current default password length requirement is too low, so we want to require longer passwords among other things. We select Account Settings > Password Policy > Edit under IAM.
When prompted, we will choose Set custom.


In summary
This was a really fun situation. My solution was looking through the documentation and attempting to figure out how to accomplish tasks using the CloudShell rather than the GUI.
